
These are seriously the best pillows. They are beyond comfortable and make the floor much more appealing than the couch for movie-watching. I've also started using them for late night study sessions when studying in a nice warm bed sounds more pleasant than at a cold table. I just replace my normal pillow with one of these. It seriously cuts down on me dowsing off because I've sunk farther down into the bed than I realize. There's no way I can lay down while using this pillow to study.
I made two of these things and didn't once think about taking pictures of each step. Oh well. They're really not too hard so hopefully written instructions unaided by visuals will suffice.
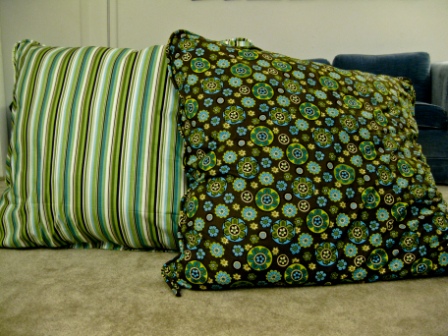
Brad and I went to Joann's and picked out the fabric we liked. I don't even remember how much I bought. The pillows are 36x36 squares. I probably bought about 3 yards, because I used the same fabric to make the cording around the pillows. I also bought 6 yards of muslin (3 yards per pillow). Here's what I did:
1. Cut 4 36x36 squares of muslin.
2. Sew 2 squares together on 3 1/2 sides.
3. Stuff the pillow. I bought all my stuffing at Wal-Mart. It's by far the cheapest place for batting. Each pillow uses 100 ounces.
4. Sew the rest of the 4th side together.
5. Cut 4 36x36 squares of fabric.
6. I bought cording and then sewed fabric around it. You can make everything, but buying the cording seemed easiest. Wrap the fabric around the cording leaving at least an inch. Sew as far away from the actual cording as possible. The first pillow I made I sewed super close to the cording, which would have been fine, but I didn't sew that close when I attached the cording to the pillow. So now you can see some of the thread around the cording in some places.
7. You can attach the cording to all four sides of the pillow if you want. I attached snaps to one side so that I can easily remove the pillow from the inside and wash the case if need be (and I'm sure there will be a need). HERE'S a great tutorial on attaching snaps if you don't know how.
8. Next attach the cording to the 2 square pieces on 3 sides. Make sure you turn the fabric inside out. I'm sure this would have been easier to follow if I had taken pictures...sorry. You should end up with a fabric sandwich. Square piece, cording pieces, square piece. Also make sure the cording is turned the right way. You definitely don't want to sew the cording on the inside of the pillow. Make sure it's on the outside. When you're sewing everything together it should be between the 2 front sides of the pillow fabric.
9. Stick in the muslin pillow, snap up the 4th side, and you're done!
No comments:
Post a Comment