Showing posts with label domestication. Show all posts

Friday, January 27, 2012

Domestication, part II

In my first domestication post I wrote how I made my very own homemade strawberry jam. It was much more of a blog-worthy post than this one will be since I took step-by-step pictures documenting the process of making jam. No step-by-step instructions here. Oh well.

My sister Elizabeth needed some good ole fashioned pioneer clothes for the youth conference trek her ward was going on over the summer, so I whipped a little something up for her.
I didn't use patterns for the apron or the skirt. I just cut out the fabric and sewed it together. However, I got the bonnet pattern HERE.

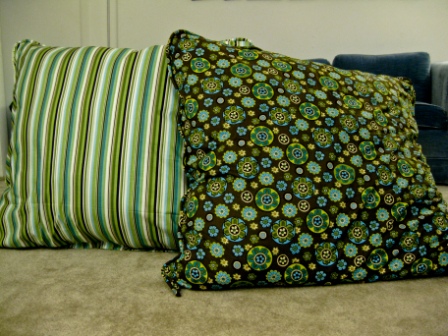
My next project was extra large lay-on-the-floor-to-watch-movies pillows. Check out the post right before this one to read step-by-step instructions.

Christmas time was filled with lots of little crafting projects. First I made this sweater for Killer. The ones we bought her last year don't fit anymore, and since we don't turn on our heat at all ever during the winter, on cold days we like to put her in a sweater while we're away from home.
She's so festive! Once again, I didn't use any pattern. I just measured her and cut. This doggie sweater is made out of an actual sweater. I just went to Goodwill and bought one that looked cute.
So I didn't make this tinsel, but the picture's so cute I couldn't resist throwing it in.
 
I made lots of these temple recommend covers to give away as Christmas presents. It's super simple - plastic canvas (you can find it at Michael's) and white yarn. Also, your life will be much easier if you have a needle big enough to handle yarn. Still no pattern. I just looked at mine and copied it.

I made these adorable snowmen for my grandmother. I'll have to make some more for myself next Christmas since they make such great decorations. They seriously took maybe 10 minutes total to make. Go HERE for the tutorial.

Susie gave us a ton of Christmas tree balls last year - way more than could ever fit on our tree. Rather than leave them in their box collecting dust I made this great wreath out of them.
There's about a hundred different ways to make these, but I followed THIS tutorial.

In order for Killer to have something under the tree beside just treats I made her another, not so Christmasy, sweater. This one's also made from a Goodwill purchase.


Here's to another year of projects and crafting and becoming even more domesticated!

Courtney

How to make extra large lay-on-the-floor-to-watch-movies pillows

These are seriously the best pillows. They are beyond comfortable and make the floor much more appealing than the couch for movie-watching. I've also started using them for late night study sessions when studying in a nice warm bed sounds more pleasant than at a cold table. I just replace my normal pillow with one of these. It seriously cuts down on me dowsing off because I've sunk farther down into the bed than I realize. There's no way I can lay down while using this pillow to study.
I made two of these things and didn't once think about taking pictures of each step. Oh well. They're really not too hard so hopefully written instructions unaided by visuals will suffice.

Brad and I went to Joann's and picked out the fabric we liked. I don't even remember how much I bought. The pillows are 36x36 squares. I probably bought about 3 yards, because I used the same fabric to make the cording around the pillows. I also bought 6 yards of muslin (3 yards per pillow). Here's what I did:
1. Cut 4 36x36 squares of muslin.
2. Sew 2 squares together on 3 1/2 sides.
3. Stuff the pillow. I bought all my stuffing at Wal-Mart. It's by far the cheapest place for batting. Each pillow uses 100 ounces.
4. Sew the rest of the 4th side together.
5. Cut 4 36x36 squares of fabric.
6. I bought cording and then sewed fabric around it. You can make everything, but buying the cording seemed easiest. Wrap the fabric around the cording leaving at least an inch. Sew as far away from the actual cording as possible. The first pillow I made I sewed super close to the cording, which would have been fine, but I didn't sew that close when I attached the cording to the pillow. So now you can see some of the thread around the cording in some places.
7. You can attach the cording to all four sides of the pillow if you want. I attached snaps to one side so that I can easily remove the pillow from the inside and wash the case if need be (and I'm sure there will be a need). HERE'S a great tutorial on attaching snaps if you don't know how.
8. Next attach the cording to the 2 square pieces on 3 sides. Make sure you turn the fabric inside out. I'm sure this would have been easier to follow if I had taken pictures...sorry. You should end up with a fabric sandwich. Square piece, cording pieces, square piece. Also make sure the cording is turned the right way. You definitely don't want to sew the cording on the inside of the pillow. Make sure it's on the outside. When you're sewing everything together it should be between the 2 front sides of the pillow fabric.
9. Stick in the muslin pillow, snap up the 4th side, and you're done!
 

Courtney

Wednesday, August 3, 2011

Domestication

I recently canned some jam. That's right - I made strawberry jam and then I canned it. If that isn't just the definition of domestic, I don't know what is. It all started when Brad and I were grocery shopping one day. We go to the Cobb International Farmers Market to get all our produce and meat because it's so darn cheap (and delicious). Right as we walked in the door we saw strawberries. Two containers for $1! That's unheard of! You can't even find one container for $1 normally. Turns out it's because they were super ripe and were going to start rotting soon, but still 2 for $1! I quickly crossed off Jam from my grocery list and bought 4 things of strawberries, determined to go home and make something yummy with them.
When we got home, I looked up tons of recipes and finally found one I liked. I halved and hulled all the berries per the recipe, and right as I was warming up my sauce pan on the stove I realized that in order to can strawberry jam I would most definitely need CANS! So I placed my berries in the frig and was off to walmart. I got home with my cans (and fruit pectin) and was so excited I could burst. But wait, how do you can things anyways? I found this awesome intro to canning that was totally written for people just like me who have never before in their life canned anything. But it would also be just peachy for those of you who have done this a million times and just need a little refresher course. Are you ready for it....drum roll, please....

Oh, and by the way, here's the recipe:
5 cups crushed strawberries (approximately 3 pounds), hulled and halved
2 Tablespoons fresh lemon juice
7 cups sugar 
1/2 teaspoon butter
1 packet fruit pectin
Combine crushed strawberries and lemon juice in a sauce pan. Still in fruit pectin and butter. Bring to a full boil over high heat, stirring constantly.
Add the sugar and stir until dissolved. Return mixture to full boil. Boil for one minute and then remove from heat.
Fill jars.

Let's begin.
The very first thing you need to do is wash all your jars and lids in HOT, soapy water. I had Brad complete this step for me. My poor little hands just have such a low pain tolerance when it comes to super hot water. Thanks hun :-)!

The next step is to keep your jars warm. If you let them cool down to room temperature and then put scalding hot jam in them they'll most likely break. (Vice versa as well...Brad once put a glass dish hot from in the oven into the sink and ran cold water over it without thinking and it shattered...oops!) So I just heated up some water on the stove to a simmer and put my jars in there until I was ready for them.

Now for the fun part - preparing the jam! The strawberries don't have to be perfectly crushed. You can still have a few bigger pieces. It'll taste great no matter what.


7 cups of sugar is seriously almost a whole 5 pound bag. Lots and lots of lots of sugar.

The next step is to fill your nice and warm jars with your toasty jam. You'll want to fill them up to about here. Apparently, according to my handy dandy canning guide, the jam will expand in the jar during the canning process, so you need to give it plenty of room to do so. Wipe any extra jam from the sides of the jars and put your lids on. Not too tight though - "fingertip tight" - in order to let the air inside escape while canning.

I don't have any pictures of the next couple of steps...sorry.
So I didn't have many of the essential tools, but everything worked out just fine. You need a pot that is deep enough to cover the jars with at least one inch of water. (I don't have a pot that large, so I used the biggest one I had, which only covered the jars with about 2 centimeters of water. But I definitely suggest using a bigger pot if you have one. In fact, I'll be buying one before my next canning adventure.) Before you put the cans straight into the water, put them on one of these things:
A canning rack. This would have been lovely to have, but if you don't have one (like me) you can still can without it. (But once again, I'll probably buy one before next time.) 
So once you've got your jars in your pot, cover the pot and boil for 5 minutes (I didn't cover the pot because all my extra water would have spilled out and everything turned out fine). P.S. the canning guide I linked to earlier has a chart with altitude adjustments for cooking time.
Next, I had a second pot filled as high as I could with simmering water. I [Brad] moved the jars from the boiling water to the simmering water and let them sit for 5 minutes. Then you place them on a towel or cooling rack and leave them alone for 12 hours.
Sorry for the blurriness.

I baked some homemade bread and we enjoyed our DELICIOUS strawberry jam on fresh warm bread. Yum.

Love, Brad & Courtney